This tutorial illustrates how to Update the system image(bootstrap, u-boot.bin. linux kernel and rootfs) by Micro SD card.
Prepare
- Confirm the WiFiG25 can boot the U-boot(if it can't boot the U-boot, please Recovery the pre-install System by SD card)
Step-by-step guide
1. Prepare the Micro SD card, Copy your system image file(only copy the file you want to update) to the Micro SD card:
You can download the system image from here(128MB system image | 256MB system image).
bootstarp file: at91sam9x5ek-nandflashboot-uboot-3.5.3.bin
U-boot file: u-boot.bin
DTS file: at91sam9g25ek.dtb
Linux kernel: uImage
File system: ubifs.img
Configure file: corewind.ini
Copy the corewind.ini to the Micro SD card, confirm the line is as follow:
[CoreWind]

Action = Install
OS = Linux

Firmware-Version = 1
Forced-Updates = true

#  Action-Type:
#  1:  bootstrap 2: u-boot  3: env
#  4:  dtb       5: data    6: logo
#  7:  kernel    8: rootfs  9: all by dt
#  10: all update by files
#
#  Notice: Now 3 5 6 not support
#

Action-Type = 10

Linux-Bootstrap = at91sam9x5ek-nandflashboot-uboot-3.5.3.bin
Linux-Uboot = u-boot.bin
Linux-Dtb = at91sam9g25ek.dtb
Linux-Kernel = uImage
Linux-RootFs = ubifs.img
If only want to update the u-boot, confirm the Linu-Uboot=u-boot.bin is leave, then remove the other line.
2. Insert the Micro SD card to the WiFiG25 board.
3. Power on the board(Insert the USB cable to the board), then the board will update the system auto.
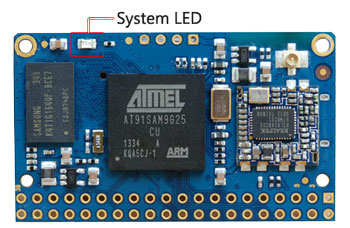
Please notice the System LED, it will light on when it recovery the system, and wait one minutes, the System LED will light off, then it means you update the system success, and then the WiFiG25 will enter the system auto(The System LED will light ON-OFF-Pause), then you should remove the TF card from the board.

